
The yellowing orchid leaves are one of the most common concerns among orchid growers, and in most cases, the cause is easy to identify and fix.
Orchid leaves turn yellow when the plant gets too much direct sunlight, receives excess water that suffocates roots, lacks nitrogen or iron, experiences sudden temperature drops, or simply sheds old lower leaves naturally. Most causes are reversible by adjusting light exposure, watering only when the top inch of bark is dry, and using orchid-specific fertilizer monthly during active growth.
I’ll walk through every cause of orchid leaf yellowing, how to tell them apart, and exactly what to do about each one. Just like diagnosing holes on rose leaves, the key is reading the pattern — where the yellow appears, how fast it spreads, and what the roots and bark look like.
What Causes Orchid Leaves to Turn Yellow?
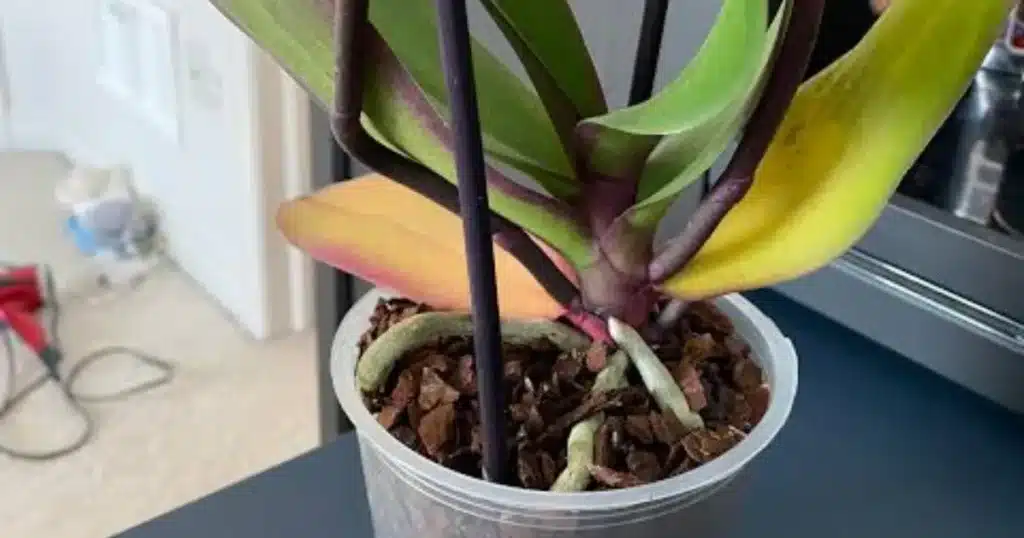
Orchids are remarkably expressive plants. Yellow leaves are their main way of flagging a problem — or, sometimes, a completely normal transition.
Before reaching for a spray bottle or fertilizer, spend a minute looking at which leaves are yellowing, how the yellow looks, and what the growing medium looks like. Those three clues narrow it down fast.
If you’ve noticed your orchid leaves curling at the same time, that’s often a separate stress signal worth reading alongside this guide — check out our post on plant leaves curling for what to watch for.
Natural Leaf Shedding
The most common reason an orchid’s lowest leaf turns yellow — and the one that causes the most unnecessary panic — is simple aging.
Orchids periodically shed their oldest, lowest leaves as a normal part of their growth cycle. The leaf yellows gradually from the base, stays firm (not mushy), and the rest of the plant looks completely healthy.
If only one or two bottom leaves are yellowing and the plant is otherwise growing new roots or a new leaf, this is almost certainly what you’re seeing. No action needed.
Too Much Direct Sunlight
Orchids — especially Phalaenopsis, the most common grocery-store variety — are adapted to filtered light under a forest canopy. Direct sun, particularly through a south- or west-facing window in summer, burns them quickly.
Sun-damaged leaves yellow unevenly, often starting in patches, and may develop a bleached or papery look. The yellowing tends to show up on the top side of the leaf facing the glass.
Move the plant to a spot with bright, indirect light. An east-facing window or a spot set back 2–3 feet from a south-facing window is ideal.
Overwatering and Root Rot
Overwatering is the single most damaging mistake orchid owners make, and yellowing leaves are usually the first visible sign that roots are in trouble.
When the bark or growing medium stays wet for too long, roots can’t breathe. They turn brown and mushy, lose their ability to deliver water and nutrients, and the leaves start yellowing — often multiple leaves at once, starting with the lower ones.
How to identify it:
Lift the pot and look through the drainage holes or clear pot walls if you have them. Healthy orchid roots are plump, firm, and silvery-white (or green when wet). Rotting roots are dark brown, hollow, or slimy.
If you spot root rot, here’s what to do:
- Remove the plant from its pot and gently shake off the old bark.
- Trim all rotted roots with sterile scissors — cut back to firm, white tissue.
- Let the roots air-dry for 20–30 minutes.
- Repot into fresh orchid bark, choosing a pot only slightly larger than the root ball.
- Hold off watering for 3–4 days to let any cut ends callous over.
Going forward, water only when the top inch of bark feels dry, and always let excess water drain completely — never let an orchid sit in standing water.
Underwatering
Less common than overwatering, but underwatering can also cause yellowing — particularly if the plant is in a very dry or warm environment.
Underwatered orchid leaves tend to yellow while also looking slightly wrinkled or leathery, especially toward the leaf tips. The bark will be completely dry and the roots will look shriveled and silvery-grey even after you’ve just watered.
Soak the bark thoroughly by placing the pot in a bowl of room-temperature water for 10–15 minutes, then drain fully. Resume regular watering as the top inch of bark dries out.
Nutrient Deficiency
Orchids are light feeders, but they do need nutrients — especially nitrogen (N) for leaf health and iron for chlorophyll production. A deficiency in either one causes leaves to turn pale or yellow.
Nitrogen deficiency shows as an overall pale yellowing across multiple leaves, starting with older leaves first. Iron deficiency tends to show up as yellowing between the leaf veins (interveinal chlorosis), with the veins themselves staying greener.
Use a balanced orchid fertilizer — look for one labeled “20-20-20” or specifically formulated for orchids — at half the recommended strength, applied every 2–4 weeks during the active growing season (spring through early fall). Pause or reduce fertilizing in winter when growth slows.
Cold Temperatures and Drafts
Orchids are tropical plants. They dislike cold drafts, air conditioning vents, and temperatures below 55°F (13°C). Sudden temperature swings stress the plant quickly.
Cold-damaged leaves yellow from the tips or edges inward, and may also develop soft or translucent patches. This can look similar to overwatering damage, which is why placement matters. If you’re also seeing leaves turning transparent or translucent, cold damage or water-logging is the likely culprit.
Keep orchids away from windows that get frost, exterior doors, and air conditioning or heating vents. Most Phalaenopsis orchids do best between 65°F and 80°F (18°C–27°C).
Pests
Certain pests — particularly scale insects, mealybugs, and spider mites — damage leaf tissue in ways that cause localized yellowing or yellow speckling.
How to identify it:
Look closely at the undersides of leaves, along the midrib, and where leaves attach to the stem. Scale insects look like small brown or tan bumps. Mealybugs appear as white cottony clusters. Spider mites leave fine webbing and cause a stippled, dusty-yellow appearance.
If you spot yellow spots or markings on the leaves that look unusual, pests could be involved — especially if the pattern is uneven or dotted rather than a broad wash of color.
Treat light infestations by wiping leaves down with a cotton pad soaked in 70% isopropyl alcohol. For heavier infestations, a diluted neem oil spray works well — mix 2 teaspoons of neem oil, 1 teaspoon of dish soap, and 1 liter of water, then spray all leaf surfaces weekly until clear.
For pest prevention and treatment, I use a diluted neem oil spray on my orchids — it’s gentle enough for regular use and highly effective against scale, mealybugs, and spider mites.
I use bliss pure neem oil from Amazon for a great price. It works great when it comes to shining leaves and provides a layer of protection for plants against common pests.

Disease (Fungal or Bacterial)
Fungal and bacterial infections can cause yellowing that spreads outward from a sunken, water-soaked spot on the leaf. The yellow patch often has a brown or black center, and the tissue around it may feel soft.
Bacterial rot spreads fast — sometimes within 24–48 hours — so act quickly. Remove the affected leaf with a sterile blade, cutting well into healthy tissue. Dust the cut with cinnamon (a natural antifungal) or a copper-based fungicide.
Improve air circulation around the plant and avoid getting water on the leaves when you water.
How to Identify the Cause at a Glance
Quick Reference Diagnosis Table
| Cause | Visual Pattern | Solution |
|---|---|---|
| Natural aging | Single lower leaf, firm, rest of plant healthy | Do nothing |
| Too much sun | Patches, bleached, top of leaf | Move to indirect light |
| Overwatering/Root rot | Multiple leaves, mushy roots, soggy bark | Trim roots, repot, reduce watering |
| Underwatering | Yellow + wrinkled/leathery, dry bark | Soak and resume regular watering |
| Nutrient deficiency | Pale overall (N) or interveinal yellow (Fe) | Orchid fertilizer, half-strength |
| Cold/drafts | Tips and edges first, may be translucent | Relocate, stabilize temperature |
| Pests | Speckling, stippling, or spotty yellow | Alcohol wipe or neem oil spray |
| Disease | Sunken spot with yellow halo, soft tissue | Remove leaf, fungicide, improve airflow |
How to Fix Yellow Orchid Leaves (Step-by-Step)
Not every yellow leaf needs a dramatic intervention. Work through these steps before changing anything about your care routine.
- Check which leaves are yellowing. Bottom leaves only? Probably natural aging. Multiple leaves, including middle or upper ones? Investigate further.
- Inspect the roots. Lift the pot, look through clear walls or drainage holes. Mushy or dark roots point to overwatering; shriveled silver roots point to underwatering.
- Assess the light. Is the plant within direct sun range of a window? Try moving it back or filtering the light with a sheer curtain.
- Check for pests. Flip the leaves and look at the undersides. Give the leaf surface a close look at the base and midrib.
- Review your watering. When did you last water? How wet is the bark right now? Water only when the top inch is dry.
- Consider fertilizing. If you haven’t fertilized in months and multiple leaves are uniformly pale, feed with half-strength orchid fertilizer.
Most orchids recover well once the underlying cause is corrected. The yellowed leaf itself won’t turn green again — but new, healthy leaves will follow.
Prevention: Keeping Orchid Leaves Green Long-Term
Getting the basics right consistently is the most effective prevention strategy.
Light: Bright, indirect light year-round. An east-facing window is ideal. Avoid direct afternoon sun in summer.
Watering: Water thoroughly, then wait. The bark should dry out slightly between waterings — roughly every 7–10 days in summer, every 10–14 days in winter. Always empty the saucer.
Fertilizer: Half-strength balanced orchid fertilizer every 2–4 weeks during active growth. Reduce to once a month or skip in winter.
Temperature: Keep the plant between 65°F and 80°F. No cold drafts, no heat vents directly nearby.
Humidity: Orchids prefer 40–70% humidity. In dry homes, a pebble tray with water under the pot (not touching the drainage holes) helps. Avoid misting leaves, which can promote fungal issues.
A periodic check of your orchid’s roots and leaves — every time you water — catches problems early, before they escalate to significant yellowing. The same principle applies when diagnosing color changes across other plants, whether that’s leaves turning dark green or other unexpected shifts.
When to Worry
Most yellowing orchid leaves are not emergencies. But a few situations call for faster action.
Act quickly if:
- Multiple leaves yellowed within a few days
- You see soft, sunken, spreading spots that smell bad (bacterial rot)
- The roots are mostly black and mushy with very few healthy ones remaining
- The plant has dropped all but one or two leaves
Bacterial rot, in particular, can spread to the crown — the central growing point — within 48 hours if not caught. A yellow leaf with a water-soaked center is the warning sign to act on immediately.
If you’ve caught root rot late and the plant has lost most of its roots, it can still recover in many cases — repot into fresh bark, keep humidity high, and be patient. Orchids are more resilient than they look.
Frequently Asked Questions
Should I cut off yellow orchid leaves?
Only if the leaf is fully yellow, dead, or infected. Remove it cleanly at the base with sterile scissors. Partially yellow leaves that are still firm and green in places should be left — removing healthy tissue stresses the plant unnecessarily.
Can yellow orchid leaves turn green again?
No. Once leaf tissue loses chlorophyll and turns yellow, it won’t reverse. The goal is to stop additional yellowing by addressing the cause, then let the plant produce new healthy leaves.
Why is my orchid’s new leaf coming in yellow?
A new leaf emerging yellow — rather than yellowing after it’s mature — is a stronger signal of nutrient deficiency, particularly iron or magnesium. Start fertilizing with a balanced orchid fertilizer at half strength and ensure the plant is in adequate light.
How often should I water an orchid to prevent yellowing?
The standard rule is: water when the top inch of bark is dry, roughly every 7–14 days depending on your environment. Stick your finger into the bark — if it feels dry an inch down, water thoroughly and drain completely.
Is it normal for orchid leaves to yellow after repotting?
Yes — it’s common for one or two lower leaves to yellow after repotting as the plant adjusts to new bark and recovers from any root disturbance. As long as new roots are developing and the rest of the plant looks healthy, this is temporary.
The Bottom Line
Yellow orchid leaves are the plant’s way of telling you something — but in most cases, it’s not a crisis. Natural leaf shedding, a watering adjustment, or a shift in light position solves the majority of cases. More serious causes like root rot and pests are very manageable when caught early.
The key is looking at the whole picture: which leaves, how they look, what the roots are doing, and what’s changed in the plant’s environment recently.
Once you identify the cause and make the adjustment, most orchids bounce back — and the new leaves that follow will come in green, firm, and healthy.
—
Related Posts
- Plant Leaves Curling: Causes and Fixes
- Leaves Turning Transparent or Translucent
- Squash Leaves Turning Yellow
- Cucumber Leaves Turning Yellow
- Holes on Rose Leaves: What’s Causing Them
Related Articles
Pepper leaves curling? Learn the 7 most common causes — from underwatering and heat stress to aphids and viral disease — plus step-by-step fixes to help your plants recover fast.
Pepper Leaves Turning Yellow: Why It Happens and How to Fix It
Pepper plant leaves turning yellow? Learn the 7 most common causes — from nitrogen deficiency to overwatering — and get specific, actionable fixes to bring your pepper plants back to health.