
You’re checking on your tomato plants, and you notice small white or tan bumps running up the stem. They weren’t there last week now there are dozens of them. Is it a disease? Bugs? Something worse?
Take a breath. In most cases, those bumps are completely harmless.
Bumps on tomato plant stems are almost always adventitious root initials small white or tan nodules the plant produces naturally when it’s stressed, buried too deep, or exposed to high humidity. They’re a normal part of how tomatoes grow, not a sign of disease or pest damage. If the stem touches soil, these bumps develop into real roots that help anchor and feed your plant. Only in rare cases when the bumps are raised, corky, or accompanied by other symptoms do they signal a problem worth addressing.
Let’s break down every possible cause, how to tell them apart, and what (if anything) you should do.
What Are the Bumps on Your Tomato Stem?
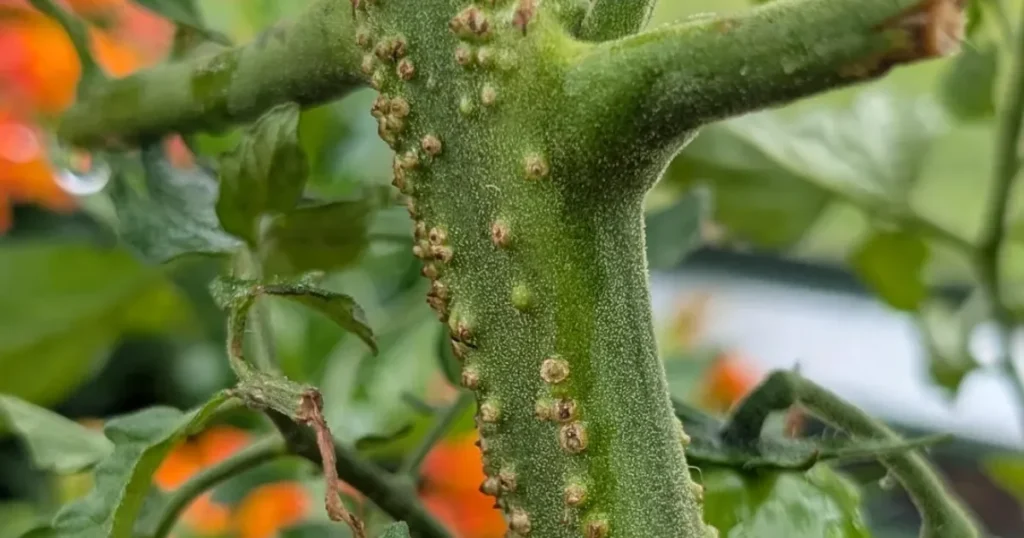
Before anything else, it helps to understand that tomatoes are one of the most root-happy plants in the vegetable garden. Given the chance, they’ll throw out roots from almost any point along their stem.
Those bumps are the plant’s way of saying: I could grow a root here if conditions were right.
Most of the time, that’s genuinely all they are. But bumps can occasionally mean something else so it’s worth knowing exactly what you’re looking at.
The Most Common Causes of Bumps on Tomato Stems
Adventitious Root Initials (The Most Likely Culprit)
This is the big one. Adventitious root initials are pre-formed root tissue that sits just beneath the surface of the stem, waiting for the right conditions to emerge.
They appear as small, round, white or cream-colored bumps usually evenly spaced along the stem, often running in lines. They’re firm to the touch and don’t weep, smell, or spread.
Tomatoes develop these naturally, especially on the lower portion of the stem. The plant produces them when it senses it could benefit from more root mass often triggered by high humidity, cool nights, overwatering, or the stem being close to the soil surface.
These bumps are, in fact, a feature rather than a flaw. Tomato growers deliberately bury their plants deep at transplant time to take advantage of exactly this more stem buried means more roots, which means a stronger, more productive plant.
If your plant also looks healthy green leaves, steady growth, no wilting adventitious root initials are almost certainly what you’re seeing. No action needed.
Deep Planting or Hilling Up Soil
Tomatoes are one of the few vegetables that actively benefit from being planted deeper than they came in the pot. When you bury the lower stem, the cells that were forming adventitious root initials develop into true roots.
If you’ve recently transplanted, hilled up soil around the base, or mulched heavily, you may notice a flush of bumps just above the soil line. That’s your plant responding exactly the way you want it to.
This is also why leggy tomato seedlings are actually easy to fix you just bury the extra stem, and those adventitious bumps become a bigger, stronger root system almost immediately.
High Humidity and Moisture at the Stem Surface
Consistently humid conditions especially in greenhouses, polytunnels, or densely planted raised beds accelerate the development of adventitious root initials.
The bumps become more visible when moisture sits against the stem for extended periods. This is common after several days of rain, when plants are crowded, or when there’s limited airflow around the base.
This is usually not a problem. But it’s worth checking your soil drainage and spacing if bumps seem to be multiplying fast and you also notice yellowing lower leaves which can be a sign of stress. Check out our guide to yellow leaves on tomato plants if you’re seeing both symptoms at once.
Overwatering and Root Stress
Roots need oxygen as much as they need water. When soil stays waterlogged, the roots suffocate and the plant compensates by trying to generate new root points higher up the stem, closer to air.
If your bumps are accompanied by wilting that doesn’t improve when you water, yellowing leaves, and soggy-feeling soil, overwatering could be driving the problem. Our guide on wilting tomato plants walks through how to distinguish overwatering from other stress causes.
The fix: let the soil dry out between waterings. Stick your finger two inches into the soil if it still feels wet, wait. Only water when the top two inches are dry.
I keep a soil moisture meter on hand to check whether the top two inches are truly dry before watering it removes all the guesswork.
Take the guesswork out of watering plants and keeping the soil moist. It is both cost-effective and durable.
Best of all, it also measures pH and light. It’s worth a look.

Oedema (Less Common, But Worth Knowing)
Oedema is a physiological condition not a disease where the plant takes up water faster than it can transpire it. Cells fill with fluid and burst through the skin of the stem or leaves, forming corky, slightly raised bumps or blisters.
On tomato stems, oedema bumps tend to look different from adventitious root initials. They’re more irregular in shape, slightly rough or scabby in texture, and may appear on the undersides of leaves as well as on stems. They can be tan, brown, or even reddish.
Oedema is most common in cool, cloudy weather when humidity is high but light levels are low conditions that slow transpiration while the roots keep drinking.
The plant isn’t diseased. No spray or treatment will fix it. Improve airflow, reduce watering slightly, and wait for brighter weather. Most plants recover without any lasting damage.
Bacterial Canker (Rare, But Serious)
This is the one case where bumps on a tomato stem deserve real attention.
Bacterial canker (Clavibacter michiganensis) can cause raised, blister-like spots on stems, often surrounded by white or straw-colored halos. As the disease progresses, you may also see:
- Dark, sunken streaks on the stem
- Wilting that starts on one side of the plant
- “Bird’s eye” spots on fruit (white circles with dark centers)
- Brown discoloration when you cut the stem open
Bacterial canker spreads through infected seed, contaminated tools, and water splash. If you suspect it, isolate the plant immediately and do not compost affected material. Remove and dispose of it in the bin.
The good news: true bacterial canker is relatively uncommon in home gardens and usually comes with multiple additional symptoms. Bumps alone with no wilting, no streaking, no fruit spots are almost never bacterial canker.
Tomato Russet Mite Damage (Rare, Looks Different)
If your bumps are more like a rough, bronze or brown discoloration working its way up the stem from the base almost like the stem is turning corky or “russetted” tomato russet mite could be the cause.
These mites are microscopic and not visible to the naked eye. The damage, however, is distinctive: a brownish, slightly scaly texture that climbs the stem over several weeks. Leaves in the affected zone often yellow and die.
A 10x hand lens will sometimes let you see the mites moving in large numbers. If you suspect russet mite, a sulfur-based spray or insecticidal soap applied thoroughly to all stem surfaces is the standard treatment.
How to Tell the Bumps Apart at a Glance
Quick Reference Diagnosis Table
| Bump Type | Appearance | Location | Cause | Action Needed? |
|---|---|---|---|---|
| Small, white, round, firm | Evenly spaced, lower stem | Adventitious root initials | None | |
| Corky, irregular, rough | Stem and leaf undersides | Oedema | Improve airflow, reduce watering | |
| Raised, white-haloed blisters | Stem, spreading | Bacterial canker | Remove plant, disinfect tools | |
| Bronze, scaly texture climbing stem | Base upward | Russet mite damage | Sulfur spray or insecticidal soap |
How to Fix It (When Action Is Needed)
For most gardeners reading this, the answer is: nothing. But here’s a quick action plan for each scenario.
If it’s adventitious root initials:
Leave them alone. If the stem is above the soil, you can hill up compost or soil around the base to turn those potential roots into real ones. This gives your plant a genuine boost.
If it’s oedema:
Reduce watering and improve airflow. Space plants at least 1824 inches apart. Remove leaves that sit directly on the soil to improve circulation.
If you suspect overwatering:
Let the soil dry out, then establish a consistent watering schedule. A dilute hydrogen peroxide solution (1 tablespoon of 3% hydrogen peroxide per cup of water) can help restore oxygen to waterlogged soil and discourage root rot organisms we go into full detail on using hydrogen peroxide for root rot and soil health in a dedicated guide worth bookmarking.
I use a dilute hydrogen peroxide solution whenever I suspect waterlogged soil it restores oxygen and helps prevent root rot organisms from taking hold.
I use this Essential Oxygen Food Grade Hydrogen Peroxide for my plants. It kills unwanted bacteria and helps boost the overall health of the soil. It’s concentration is just right.

If it’s bacterial canker:
Remove affected plants entirely. Disinfect your tools with a 1 – 0% bleach solution (1 part bleach, 9 parts water) between uses. Start with certified disease-free seed the following season.
If it’s russet mite:
Apply a sulfur-based fungicide/miticide or insecticidal soap to all stem surfaces, covering thoroughly. Repeat every 7 days until symptoms stop progressing.
Prevention: Keeping Bumps Where They Belong
A few consistent habits prevent the problematic causes while letting your plant take full advantage of the beneficial ones.
Space plants properly. At least 1824 inches between plants in a row, 3 – 6 inches between rows, keeps airflow strong and humidity low at the stem level.
Water deeply and infrequently. Shallow, frequent watering keeps the upper soil soggy and starves roots of oxygen. Water until it drains freely from the pot or runs 6 inches deep in-ground, then wait until the top 2 inches dry before watering again.
Mulch the base but not against the stem. A 2 – 3 inch layer of straw or shredded bark conserves moisture and keeps soil temperatures even. Keep mulch 2 inches away from the stem to prevent constant moisture contact that encourages oedema and disease.
Bury your transplants deep. When you transplant, remove the lower leaves and bury the stem up to the lowest remaining leaf pair. Those adventitious bumps become real roots, and your plant starts the season with a much larger root system.
Monitor your fertilizing schedule. Stressed, nutrient-deficient plants produce more adventitious root initials as a survival response. A balanced tomato fertilizer applied every 2 – 3 weeks during the growing season keeps plants in healthy, steady growth rather than survival mode.
If a stem does get broken or bent in the process of staking or pruning, don’t panic a broken plant stem can often be splinted and saved if you catch it early.
When to Worry
Here’s a simple rule: bumps alone are almost never a problem.
Start paying attention when bumps appear alongside other symptoms:
- Wilting that doesn’t recover overnight
- Yellowing leaves spreading upward
- Streaking, darkening, or cracking on the stem surface
- Fruit with unusual spotting
- A corky, bronze discoloration climbing from the base
Any one of those secondary symptoms turns “probably fine” into “worth investigating further.” But small, white, firm, round bumps on an otherwise healthy green plant? That’s just your tomato doing what tomatoes do.
Frequently Asked Questions
Are the white bumps on my tomato stem harmful?
In the vast majority of cases, no. White, round, firm bumps are adventitious root initials a completely normal part of tomato plant biology. They become a concern only if accompanied by wilting, discoloration, or other disease symptoms.
Should I remove the bumps?
No. Trying to scrape or remove adventitious root initials can damage the stem. Leave them alone, or encourage them to develop into roots by burying that section of stem in compost-enriched soil.
Do bumps mean my tomato is overwatered?
Not necessarily. Adventitious root initials appear for many reasons high humidity, cool nights, and deep planting are more common triggers than overwatering. Check the soil: if it’s consistently soggy and your plant is wilting, overwatering may be a factor. If the soil dries normally and the plant looks healthy, the bumps are almost certainly harmless.
Can I still eat tomatoes from a plant with bumpy stems?
Yes adventitious root initials and oedema have no effect on fruit quality or safety. Even in the unlikely case of bacterial canker, the fruit itself is generally considered safe to eat (though most growers choose not to, out of caution).
Why do my tomato seedlings have bumps so early?
Young seedlings in humid conditions develop adventitious root initials quickly. This is especially common when seedlings are kept under grow lights with limited airflow. It’s not a problem it’s actually a sign the seedling has good root-forming potential.
The Bottom Line
Bumps on tomato plant stems look alarming the first time you see them. In reality, they’re one of the most benign things you can find on a tomato plant. Adventitious root initials are the plant’s built-in mechanism for expanding its root system a feature, not a flaw.
Check the other signals: is the plant growing well, staying green, and producing? Then the bumps are almost certainly harmless. Only when wilting, streaking, bronzing, or fruit spotting appear alongside the bumps does it become a diagnostic situation.
When in doubt, bury a little more stem, improve your airflow, and let the plant do what tomatoes do best grow roots wherever they possibly can.
Related Posts
- Using Hydrogen Peroxide for Plants (Including Root Rot)
- Yellow Leaves on Tomato Plants: Causes and Fixes
- Tomato Plant Wilting: The Causes and Solutions
- Leggy Tomato Seedlings: How to Fix Them
- Can You Use Tomato Fertilizer on Other Plants?
Related Articles
Pepper leaves curling? Learn the 7 most common causes — from underwatering and heat stress to aphids and viral disease — plus step-by-step fixes to help your plants recover fast.
Pepper Leaves Turning Yellow: Why It Happens and How to Fix It
Pepper plant leaves turning yellow? Learn the 7 most common causes — from nitrogen deficiency to overwatering — and get specific, actionable fixes to bring your pepper plants back to health.